Showing posts with label orange. Show all posts

20 October 2011

Chocolate week, baking week, is there any week that isn't a week, cookies!

Hello. You may remember a few weeks back was National Cupcake Week, in honour of which I created some peanut butter & jam cupcakes. Well I posted a piccie of said cupcakes on the Baking Mad Facebook page & ended up winning a pack of orange flavour buttons which I probably got a bit too excited about. If you're not a fan already I'd recommend joining, they often run giveaways & competitions. The Baking Mad website is also worth a look for all things related to baking & cupcake making!

So they are the inspiration for this weeks recipe, which I created to celebrate both Chocolate Week (last week) & Baking Week (this week) It never ceases to amaze me the number of 'weeks' we actually have, although I feel there's a critical one missing. I think we absolutely have to have a 'National Eat Crisps Week' where every meal has to be accompanied by a potato based snack! Who's with me??

The orange buttons are made from cocoa butter & made a great cookie topping, I also added some natural orange essence to the cookie dough mixture to create the perfect chocolate orange cookie.

100g unsalted butter
140g caster sugar
1 egg
140g SR flour
25g cocoa powder
2tsps natural orange essence
Pack of Silver Spoon orange flavour buttons

1. Cream the butter & sugar until light & fluffy, then beat in the egg gradually until you have a lovely smooth batter.

2. Sift in the flour & cocoa powder & fold together, finally add the orange essence.

3. Place small dollops of cookie dough onto a baking sheet, add some buttons to the top. Don't worry it they look a bit squished, they'll spread out when the cook.

4. Bake in the oven at 180c/GM4 for around 10-12 minutes. Leave to cool completely & crisp up.

Looking at the finished article they would probably be quite good for a Halloween party if you were that way inclined? As my friend pointed out, there were a few of them that ended up looking like something out of the Mighty Boosh, google it, you'll see! Enjoy, Rebecca x

30 December 2010

Week 50 - Windsor Mess

Happy Christmas everyone! I hope you've all had a lovely break? Me, I had lovely few days relaxing at my Mum's, thankfully I managed to shake off the cold I had & my appetite returned to something resembling normal. I hope you were all good this year & Santa brought you lots of lovely things? I had an early Christmas present on Christmas Eve, the local paper published an article about my year long baking, blogging challenge! The article also invited readers to send in suggestions for my final recipe...it is only 2 weeks away, yikes! I extend that invitation to you too, if you think I've missed an essential recipe, or you have a favourite you'd like to suggest I'd love to hear from you. Just leave a comment on this post or send me an email at rebeccabakescakes@hotmail.com. I was quite chuffed with the article, although having my photo taken in my kitchen was a little stressful! Click here to have a look at the online version of the article.

So this weeks recipe is a dessert rather than a cake, but after copious amounts of Christmas cake, mince pies & Christmas pudding over the last week, I thought this might be a welcome change. It's my twist on the classic Eton Mess, as I live just a hop over the bridge in Windsor, I thought I'd call it a Windsor Mess (apologies if this is already copywritten or in existence!) Eton Mess is made with raspberries & for me tastes like Summer, my version uses spiced oranges & tastes altogether more wintry & Christmassy! I also added orange rind to the meringue which gives a really subtle flavour.

For the meringue
2 egg whites
100g caster sugar
Grated rind of 1 orange

For the orange sauce
40g butter
120g demerera sugar
1 tsp mixed spice
2 tbps water
3 large oranges

Pot of whipping cream

1. Beat the egg whites until stiff, add half the sugar & orange rind then beat some more until they go stiff again. Finally fold in the other half of the sugar with a spoon. Line a baking sheet with baking paper, place dollops of the mixture onto the tray & pop in the oven at 130c/GM1 for a couple of hours until they have dried out & are crisp. My batch made 6 meringues.

2. To make the orange sauce, place the butter, sugar, spice & water into a pan. Heat gently until melted together, then bring up to the boil & bubble for a couple of minutes, take off the heat.

3. Top & tail the oranges, then carefully slice down the sides to remove all the skin & pith, then cut into small chunks. Stir the oranges into the caramel sauce & leave to cool completely. Finally whip the cream until it forms soft peaks.

4. Now for the construction! I used my martini glasses, but a sundae dish would be just as good. Take 1 of the meringues & break it into small pieces, place a spoonful of oranges in the bottom of the glass, then sprinkle over half of the crushed meringue. Add a layer of cream, the some more oranges & a couple of spoonfuls of the sauce. Finally sprinkle the rest of the meringue over the top.

I really liked this combination of the tangy oranges with the sweet caramel sauce, meringue & cream. It's perfect if you have people over for dinner as you can make everything in advance & just throw it together when you're ready to serve, well it is meant to be a mess!

All that's left for me to do is wish you a very Happy New Year, Rebecca x

p.s. don't forget to suggest a recipe for my final week!

7 September 2010

Week 34 - Rhubarb & Orange Crumble Cake

Hello! Sorry this is going to be a bit of a short post this week. I'm on a bit of a European tour with work this month & as much as I could ramble on about coffee & my numerous trips to Belgium & Holland, I'm going to just keep it all about the cake!

So last week I mentioned that my good friend had been inspired to bake up a feast over the bank holiday weekend. One of the cakes she made was so delicious, I promised I would make it this week. The recipe came from an old Good Housekeeping recipe book & is made with rhubarb from her own garden (which I think makes it taste even better!) Anne gave me a good tip for preparing the rhubarb so it keeps its shape & doesn't go too mushy. Wash it & cut it into chunks, place it on a baking tray, add a little water, then pop it in the oven on 180c/GM4 for around 15 minutes. Lift it out & leave it cool, then drain off the excess water. Then it's ready to use.

For the cake
125g butter
125g caster sugar
125g self raising flour
2 eggs
Finely grated rind of 1 orange
200g rhubarb (prepared as above)

For the crumble
60g butter
125g plain flour
2 tbsp sugar
1/2 tsp cinnamon

1. Cream together the butter & sugar, gradually beat in the eggs until light & fluffy. Fold in the flour & orange rind. Pour the mixture into a loose bottom cake tin, then spread the prepared rhubarb over the top.

2. To make the crumble rub together the butter & flour until you have something that looks like fine breadcrumbs, then stir in the sugar & cinnamon. Spread the crumble over the top of the rhubarb.

3. Bake in the oven at 190c/GM5 for around 45-50 minutes until the crumble has just started to brown. Lift out & leave to cool before lifting out of the tin.

I served this as a dessert, warm, with a good dollop of cream. It would probably work just as well with custard, or cold with a cup of tea! It's hard to believe I've only got 18 weeks left to go in my baking challenge, the weeks are whizzing by! I hope you're still enjoying all the cakes? Thanks for all your comments, I love hearing from you! Have a good week, I'm off to unpack, then pack again. Take care, Rebecca x

14 April 2010

Week 13 - Clementine Cake

Hello, this week is a double celebration! Not only has my baking challenge reached a quarter of the way through, but my friends welcomed their baby daughter into the world on Friday. It's fabulous news & I promised that I would make this cake to celebrate, so this one is for the Cooper family, congratulations! Although with a new baby in the house, you're probably thinking baking will be the last thing on Mum's mind, but don't worry, I have packaged some of my cake up & it's on it's way up the country!

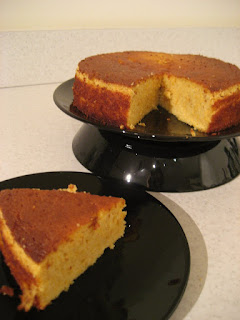
I really wasn't sure what a Clementine Cake involved, so for the first time I've sought help from a celebrity chef. This recipe comes from the domestic goddess herself, Nigella. It's such a delicious cake, but really simple to make. The only thing is you need to set aside a couple of hours to make it as the clementines have to be cooked thoroughly before they are used in the recipe.

375g clementines (about 6-7 fruits)
250g ground almonds
6 eggs
225g sugar
Heaped teaspoon baking powder

1. Place the clementines in a large pan of cold water, bring up to the boil & simmer gently for 2 hours. Drain & leave to cool, then cut them in half & remove any pips. Put the fruit, skins, pith & all into a food processor. Blitz briefly until you get a soft pulp. If you haven't got a food processor you can mash them by hand they are so mushy.

2. Add all the other ingredients to the food processor & blitz until combined. If mixing by hand, beat the eggs together with the sugar & mix into the clementine pulp, then mix in the ground almonds & finally the baking powder.

3. Butter a loose bottom cake tin & tip in the mixture. Bake in the oven at 190c (turn down to 170c if using a fan oven) for about an hour. I usually place a loose bottom tin on a baking tray just in case you get any overspill! The top will brown quite quickly, so it's recommended to place a piece of baking parchment over the top for the last 20 minutes.

4. Leave to cool completely in the tin, before turning out.

I think this is possibly one of the most delicious cake I've made so far. I don't think I've made a flour less cake before & I must admit I wasn't sure, but the ground almonds combined with the sweet clementines is amazing! I really hope you get to try this one out? If anyone has any other requests, I'll be happy to try them out :-) Next week will be the final in the series of cocktail cakes & hopefully will give you a taste of summer...ta ta, Rebecca

10 February 2010

Week 4 - Cosmo Cake

This week is the first of my cocktail inspired cakes. I'm a big fan of Sex & the City, so I'm starting with Carrie & friends favourite, the Cosmopolitan! I've used a basic sponge mixture as the base & added the key flavours from a classic Cosmo, cranberry, orange & lime. I love the rich colour of a Cosmopolitan cocktail, so I thought I'd try & recreate that in the cake. I must admit I don't normally use any artificial colourings in my baking, but it is Valentines week, so it seems apt to have a red cake! For the frosting I've made a Cointreau butter cream which really helps bring all the flavours together. You can leave the Cointreau out of the recipe if you like, it'll be just as good. I hope you like it...

100g butter
100g caster sugar
100g self raising flour
2 eggs
75g dried cranberries
Juice & grated zest of 1 orange
Juice & grated zest of 1 lime
Few drops of red food colouring (optional)
2 tbsp Cointreau (optional)

For the frosting
140g icing sugar
60g butter
2 tbsp Cointreau (optional)

1. Cream the butter & sugar together in a large bowl, beat in the eggs one at a time to make a smooth batter

2. Mix in the cranberries, Cointreau & the juice & zest of the orange & lime, keeping a little of the orange zest back for the frosting

3. Fold in the flour until it's all combined, then add a few drops of red food colouring until you get to the desired shade of red!

4. Pour the mixture into a greased cake tin & bake at 190c for 30-40 minutes until well risen & the top just starts to crack. Leave to rest in the tin for 10 minutes, then turn out onto a rack to cool

5. To make the frosting, cream together the butter & icing sugar then add the orange zest & Cointreau. If you're not using Cointreau, add milk instead to help make it smooth. Mix well until you end up with a lovely fluffy frosting you can smother over the cake with when cooled

I'm not sure I'd make a red cake again, it feels too un-natural! But I have to say it tastes good, the juices & Cointreau give it a lovely moist texture. There will be more cocktail cakes in the weeks to come. I think I'm going to like this new theme, cocktails without the hangover!

Next week I have a feeling you'll either love or hate the recipe, Rebecca
Showing posts with label orange. Show all posts

20 October 2011

Chocolate week, baking week, is there any week that isn't a week, cookies!

Hello. You may remember a few weeks back was National Cupcake Week, in honour of which I created some peanut butter & jam cupcakes. Well I posted a piccie of said cupcakes on the Baking Mad Facebook page & ended up winning a pack of orange flavour buttons which I probably got a bit too excited about. If you're not a fan already I'd recommend joining, they often run giveaways & competitions. The Baking Mad website is also worth a look for all things related to baking & cupcake making!

So they are the inspiration for this weeks recipe, which I created to celebrate both Chocolate Week (last week) & Baking Week (this week) It never ceases to amaze me the number of 'weeks' we actually have, although I feel there's a critical one missing. I think we absolutely have to have a 'National Eat Crisps Week' where every meal has to be accompanied by a potato based snack! Who's with me??

The orange buttons are made from cocoa butter & made a great cookie topping, I also added some natural orange essence to the cookie dough mixture to create the perfect chocolate orange cookie.

100g unsalted butter
140g caster sugar
1 egg
140g SR flour
25g cocoa powder
2tsps natural orange essence
Pack of Silver Spoon orange flavour buttons

1. Cream the butter & sugar until light & fluffy, then beat in the egg gradually until you have a lovely smooth batter.

2. Sift in the flour & cocoa powder & fold together, finally add the orange essence.

3. Place small dollops of cookie dough onto a baking sheet, add some buttons to the top. Don't worry it they look a bit squished, they'll spread out when the cook.

4. Bake in the oven at 180c/GM4 for around 10-12 minutes. Leave to cool completely & crisp up.

Looking at the finished article they would probably be quite good for a Halloween party if you were that way inclined? As my friend pointed out, there were a few of them that ended up looking like something out of the Mighty Boosh, google it, you'll see! Enjoy, Rebecca x

30 December 2010

Week 50 - Windsor Mess

Happy Christmas everyone! I hope you've all had a lovely break? Me, I had lovely few days relaxing at my Mum's, thankfully I managed to shake off the cold I had & my appetite returned to something resembling normal. I hope you were all good this year & Santa brought you lots of lovely things? I had an early Christmas present on Christmas Eve, the local paper published an article about my year long baking, blogging challenge! The article also invited readers to send in suggestions for my final recipe...it is only 2 weeks away, yikes! I extend that invitation to you too, if you think I've missed an essential recipe, or you have a favourite you'd like to suggest I'd love to hear from you. Just leave a comment on this post or send me an email at rebeccabakescakes@hotmail.com. I was quite chuffed with the article, although having my photo taken in my kitchen was a little stressful! Click here to have a look at the online version of the article.

So this weeks recipe is a dessert rather than a cake, but after copious amounts of Christmas cake, mince pies & Christmas pudding over the last week, I thought this might be a welcome change. It's my twist on the classic Eton Mess, as I live just a hop over the bridge in Windsor, I thought I'd call it a Windsor Mess (apologies if this is already copywritten or in existence!) Eton Mess is made with raspberries & for me tastes like Summer, my version uses spiced oranges & tastes altogether more wintry & Christmassy! I also added orange rind to the meringue which gives a really subtle flavour.

For the meringue
2 egg whites
100g caster sugar
Grated rind of 1 orange

For the orange sauce
40g butter
120g demerera sugar
1 tsp mixed spice
2 tbps water
3 large oranges

Pot of whipping cream

1. Beat the egg whites until stiff, add half the sugar & orange rind then beat some more until they go stiff again. Finally fold in the other half of the sugar with a spoon. Line a baking sheet with baking paper, place dollops of the mixture onto the tray & pop in the oven at 130c/GM1 for a couple of hours until they have dried out & are crisp. My batch made 6 meringues.

2. To make the orange sauce, place the butter, sugar, spice & water into a pan. Heat gently until melted together, then bring up to the boil & bubble for a couple of minutes, take off the heat.

3. Top & tail the oranges, then carefully slice down the sides to remove all the skin & pith, then cut into small chunks. Stir the oranges into the caramel sauce & leave to cool completely. Finally whip the cream until it forms soft peaks.

4. Now for the construction! I used my martini glasses, but a sundae dish would be just as good. Take 1 of the meringues & break it into small pieces, place a spoonful of oranges in the bottom of the glass, then sprinkle over half of the crushed meringue. Add a layer of cream, the some more oranges & a couple of spoonfuls of the sauce. Finally sprinkle the rest of the meringue over the top.

I really liked this combination of the tangy oranges with the sweet caramel sauce, meringue & cream. It's perfect if you have people over for dinner as you can make everything in advance & just throw it together when you're ready to serve, well it is meant to be a mess!

All that's left for me to do is wish you a very Happy New Year, Rebecca x

p.s. don't forget to suggest a recipe for my final week!

7 September 2010

Week 34 - Rhubarb & Orange Crumble Cake

Hello! Sorry this is going to be a bit of a short post this week. I'm on a bit of a European tour with work this month & as much as I could ramble on about coffee & my numerous trips to Belgium & Holland, I'm going to just keep it all about the cake!

So last week I mentioned that my good friend had been inspired to bake up a feast over the bank holiday weekend. One of the cakes she made was so delicious, I promised I would make it this week. The recipe came from an old Good Housekeeping recipe book & is made with rhubarb from her own garden (which I think makes it taste even better!) Anne gave me a good tip for preparing the rhubarb so it keeps its shape & doesn't go too mushy. Wash it & cut it into chunks, place it on a baking tray, add a little water, then pop it in the oven on 180c/GM4 for around 15 minutes. Lift it out & leave it cool, then drain off the excess water. Then it's ready to use.

For the cake
125g butter
125g caster sugar
125g self raising flour
2 eggs
Finely grated rind of 1 orange
200g rhubarb (prepared as above)

For the crumble
60g butter
125g plain flour
2 tbsp sugar
1/2 tsp cinnamon

1. Cream together the butter & sugar, gradually beat in the eggs until light & fluffy. Fold in the flour & orange rind. Pour the mixture into a loose bottom cake tin, then spread the prepared rhubarb over the top.

2. To make the crumble rub together the butter & flour until you have something that looks like fine breadcrumbs, then stir in the sugar & cinnamon. Spread the crumble over the top of the rhubarb.

3. Bake in the oven at 190c/GM5 for around 45-50 minutes until the crumble has just started to brown. Lift out & leave to cool before lifting out of the tin.

I served this as a dessert, warm, with a good dollop of cream. It would probably work just as well with custard, or cold with a cup of tea! It's hard to believe I've only got 18 weeks left to go in my baking challenge, the weeks are whizzing by! I hope you're still enjoying all the cakes? Thanks for all your comments, I love hearing from you! Have a good week, I'm off to unpack, then pack again. Take care, Rebecca x

14 April 2010

Week 13 - Clementine Cake

Hello, this week is a double celebration! Not only has my baking challenge reached a quarter of the way through, but my friends welcomed their baby daughter into the world on Friday. It's fabulous news & I promised that I would make this cake to celebrate, so this one is for the Cooper family, congratulations! Although with a new baby in the house, you're probably thinking baking will be the last thing on Mum's mind, but don't worry, I have packaged some of my cake up & it's on it's way up the country!

I really wasn't sure what a Clementine Cake involved, so for the first time I've sought help from a celebrity chef. This recipe comes from the domestic goddess herself, Nigella. It's such a delicious cake, but really simple to make. The only thing is you need to set aside a couple of hours to make it as the clementines have to be cooked thoroughly before they are used in the recipe.

375g clementines (about 6-7 fruits)
250g ground almonds
6 eggs
225g sugar
Heaped teaspoon baking powder

1. Place the clementines in a large pan of cold water, bring up to the boil & simmer gently for 2 hours. Drain & leave to cool, then cut them in half & remove any pips. Put the fruit, skins, pith & all into a food processor. Blitz briefly until you get a soft pulp. If you haven't got a food processor you can mash them by hand they are so mushy.

2. Add all the other ingredients to the food processor & blitz until combined. If mixing by hand, beat the eggs together with the sugar & mix into the clementine pulp, then mix in the ground almonds & finally the baking powder.

3. Butter a loose bottom cake tin & tip in the mixture. Bake in the oven at 190c (turn down to 170c if using a fan oven) for about an hour. I usually place a loose bottom tin on a baking tray just in case you get any overspill! The top will brown quite quickly, so it's recommended to place a piece of baking parchment over the top for the last 20 minutes.

4. Leave to cool completely in the tin, before turning out.

I think this is possibly one of the most delicious cake I've made so far. I don't think I've made a flour less cake before & I must admit I wasn't sure, but the ground almonds combined with the sweet clementines is amazing! I really hope you get to try this one out? If anyone has any other requests, I'll be happy to try them out :-) Next week will be the final in the series of cocktail cakes & hopefully will give you a taste of summer...ta ta, Rebecca

10 February 2010

Week 4 - Cosmo Cake

This week is the first of my cocktail inspired cakes. I'm a big fan of Sex & the City, so I'm starting with Carrie & friends favourite, the Cosmopolitan! I've used a basic sponge mixture as the base & added the key flavours from a classic Cosmo, cranberry, orange & lime. I love the rich colour of a Cosmopolitan cocktail, so I thought I'd try & recreate that in the cake. I must admit I don't normally use any artificial colourings in my baking, but it is Valentines week, so it seems apt to have a red cake! For the frosting I've made a Cointreau butter cream which really helps bring all the flavours together. You can leave the Cointreau out of the recipe if you like, it'll be just as good. I hope you like it...

100g butter
100g caster sugar
100g self raising flour
2 eggs
75g dried cranberries
Juice & grated zest of 1 orange
Juice & grated zest of 1 lime
Few drops of red food colouring (optional)
2 tbsp Cointreau (optional)

For the frosting
140g icing sugar
60g butter
2 tbsp Cointreau (optional)

1. Cream the butter & sugar together in a large bowl, beat in the eggs one at a time to make a smooth batter

2. Mix in the cranberries, Cointreau & the juice & zest of the orange & lime, keeping a little of the orange zest back for the frosting

3. Fold in the flour until it's all combined, then add a few drops of red food colouring until you get to the desired shade of red!

4. Pour the mixture into a greased cake tin & bake at 190c for 30-40 minutes until well risen & the top just starts to crack. Leave to rest in the tin for 10 minutes, then turn out onto a rack to cool

5. To make the frosting, cream together the butter & icing sugar then add the orange zest & Cointreau. If you're not using Cointreau, add milk instead to help make it smooth. Mix well until you end up with a lovely fluffy frosting you can smother over the cake with when cooled

I'm not sure I'd make a red cake again, it feels too un-natural! But I have to say it tastes good, the juices & Cointreau give it a lovely moist texture. There will be more cocktail cakes in the weeks to come. I think I'm going to like this new theme, cocktails without the hangover!

Next week I have a feeling you'll either love or hate the recipe, Rebecca