28 April 2010

Week 15 - Espresso Biscotti

Phew! Well I made it back from holiday, but I have to be honest I wasn't sure we would! We were pretty much the last flight to leave the country the day the volcano started to erupt, so we were lucky to get away in the first place. We had a lovely week in the Egyptian sun & then a bonus 4 days waiting for a flight home. Thankfully we didn't have to move hotels & we got upgraded to all inclusive, so it wasn't all that bad being stranded! But it's back to reality with a bump & straight back into work. It's also only just over 2 weeks away from my Moonwalk Marathon, yikes! The good news is the sun & sea has really helped to heal my feet, which were starting to wear themselves out, so I'm raring to go again & there's a daunting 20 miles planned for this weekend! Thank you to everyone for their support so far, there's still time to sponsor me if you would like to help Walk the Walk & the fantastic support they give to breast cancer charities all over the country.

You can find my sponsorship page at www.walkthewalkfundraising.org/rebecca_hodgson_mw

So, on to this weeks recipe & I thought I'd try creating a recipe using another of my fav Green & Blacks choccie bars. I've used the Espresso dark chocolate to create a delicious crunchy biscotti. The first time I made biscotti I was surprised at how easy it was, it's just a bit fiddly as you have to cook it twice. Apparently biscotti actually means twice baked in Italian? (Need an Italian to confirm that for me!) There are lots of different flavours you could try, almonds, dried fruit, chocolate whatever you like really. I think Espresso is a great variation & perfect with a cup of coffee!

250g plain flour
200g caster sugar
100g bar Green & Blacks Espresso chocolate chopped into small chunks
1 tsp baking powder
Pinch of salt
3 eggs
Few drops almond essence

1. In a large bowl, mix together the flour, sugar, baking powder, salt & chocolate chunks

2. Beat the eggs with the vanilla essence, then add a little at a time to the dry ingredients & mix until it's all combined into quite a stiff dough. If it's proving tricky you can always add a tiny dash of milk to help it along

3. Tip the dough out onto a floured surface & roll it into a sausage shape. I ended up making 2 sausages as it made it a bit easier to handle! Place them onto a baking sheet lined with parchment & bake in the oven at GM3/150c for 30 mins

4. Take them out the oven & leave to rest for 5 minutes. Then using a sharp knife slice the sausages on the diagonal, to make biscotti about 2cm thick. Place them back on the tray & pop into the oven for another 15 minutes. They'll still feel a little soft when you take them out the oven, but will crisp up when cool

So there you have it, delicious biscotti! I like to dunk mine in my coffee, Douwe Egberts coffee of course!! Enjoy, next weeks recipe is a request & it's going to be a goodie, see you then! Rebecca

21 April 2010

Week 14 - Moscow Mule Cheesecake

Hola baking buds! As you read this I am on holiday, hopefully soaking up the sun & sipping a Margarita by the pool. So in the words of Blue Peter, here's one I prepared earlier! Sorry it's a bit short, but between packing & painting my toenails, I just about squeezed in enough time to write this up. Normal service will be resumed next week!

This is the final creation in the series of cocktail inspired recipes & I have to say it is far more successful than the last one! The combination of ginger & lime is delicious, enjoy...

200g ginger nut biscuits
50g butter
1tbsp golden syrup
250g marscapone
200g cream cheese
2 limes

1. Crush the biscuits into fine crumbs, ginger nuts are tough cookies, so it's best to do this in a food processor. Melt the butter, stir in the golden syrup, then add the crushed biccies. Tip the mixture into a loose bottom tin & press down well using the back of a spoon, pop it into the fridge while you prepare the topping.

2. Mix together the marscapone & cream cheese, then add the juice & zest of the limes. Smooth this mixture over the biscuit base & stick it back in the fridge for a couple of hours to set. I like to add a couple of ribbons of lime zest to the top as decoration. To do this, only zest 1 1/2 of the limes & use a veggie peeler to peel ribbons off the remaining half.

This makes a great dinner party desert, really fresh & light, & something you can just magic out of the fridge at the end of the meal! Right better get back to the packing, I think I have a few too many shoes....we are only going for a week. See you next week, Rebecca

14 April 2010

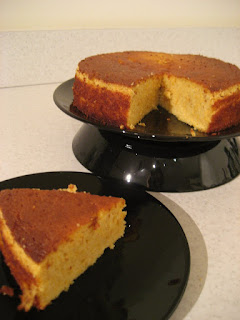
Week 13 - Clementine Cake

Hello, this week is a double celebration! Not only has my baking challenge reached a quarter of the way through, but my friends welcomed their baby daughter into the world on Friday. It's fabulous news & I promised that I would make this cake to celebrate, so this one is for the Cooper family, congratulations! Although with a new baby in the house, you're probably thinking baking will be the last thing on Mum's mind, but don't worry, I have packaged some of my cake up & it's on it's way up the country!

I really wasn't sure what a Clementine Cake involved, so for the first time I've sought help from a celebrity chef. This recipe comes from the domestic goddess herself, Nigella. It's such a delicious cake, but really simple to make. The only thing is you need to set aside a couple of hours to make it as the clementines have to be cooked thoroughly before they are used in the recipe.

375g clementines (about 6-7 fruits)
250g ground almonds
6 eggs
225g sugar
Heaped teaspoon baking powder

1. Place the clementines in a large pan of cold water, bring up to the boil & simmer gently for 2 hours. Drain & leave to cool, then cut them in half & remove any pips. Put the fruit, skins, pith & all into a food processor. Blitz briefly until you get a soft pulp. If you haven't got a food processor you can mash them by hand they are so mushy.

2. Add all the other ingredients to the food processor & blitz until combined. If mixing by hand, beat the eggs together with the sugar & mix into the clementine pulp, then mix in the ground almonds & finally the baking powder.

3. Butter a loose bottom cake tin & tip in the mixture. Bake in the oven at 190c (turn down to 170c if using a fan oven) for about an hour. I usually place a loose bottom tin on a baking tray just in case you get any overspill! The top will brown quite quickly, so it's recommended to place a piece of baking parchment over the top for the last 20 minutes.

4. Leave to cool completely in the tin, before turning out.

I think this is possibly one of the most delicious cake I've made so far. I don't think I've made a flour less cake before & I must admit I wasn't sure, but the ground almonds combined with the sweet clementines is amazing! I really hope you get to try this one out? If anyone has any other requests, I'll be happy to try them out :-) Next week will be the final in the series of cocktail cakes & hopefully will give you a taste of summer...ta ta, Rebecca

7 April 2010

Week 12 - Fruity Flapjacks

Happy Wednesday! Hope you all enjoyed the long weekend? So, Mr Brown has finally called the general election for 6th May. If anyone comes canvasing at my door, I think I'll ask them if they'll propose a new bill to make every Monday a Bank Holiday, I could get used to a 4 day week! Only thing is it means this week has gone way too quickly & I had a bit of a panic last night picking this weeks recipe. I thought you might like to know that last weeks Easter Nests were a big success at the cake sale, they helped raise over £1500. The money is being donated to our local Alzheimer's Society, so well done to all involved!

This weeks recipe is an antidote to all the chocolate we've had over the last few weeks & as they are stuffed with good stuff like oats & honey, I can kid myself that they are vaguely healthy! My Mum will probably kill me for saying this, but they are really good for breakfast with a lovely latte, especially if you have to eat on the run. I've chosen to use raisins & dried cranberries as that's what I had in the cupboard, but you could use 100g of any type of dried fruit.

100g butter
40g honey
50g caster sugar
50g raisins
50g dried cranberries
200g oats

1. Melt the butter in a large bowl, then add the honey. You'll have to give it a brisk stir to get it to combine, then add the sugar & stir again

2. Add the dried fruit, stir, then finally add the oats & stir again. It's not very technical this recipe just lots of stirring!

3. Line a baking dish approx 15cm x 15cm with baking paper (this makes it easier to lift out & cut into squares), tip in the oaty mixture & press down firmly using the back of a spoon

4. Bake in the oven at 180c/GM5 for around 30-40 minutes until the top is golden brown. Leave to cool in the dish for 10 minutes, then cut into squares. Leave to cool completely before lifting out of the dish & removing the paper.

I love these flapjacks, they're deliciously gooey on the inside with a crunchy outside, yum! So next week we hit a milestone in the history of Rebecca Bakes Cakes, we'll be 13 weeks into the challenge, that's a quarter done already. How time flies when you're having fun! Hopefully it'll also be a celebration cake as I'm hoping my friends bubba will have joined the world by then, he/she is already fashionably late! Till then , Rebecca

28 April 2010

Week 15 - Espresso Biscotti

Phew! Well I made it back from holiday, but I have to be honest I wasn't sure we would! We were pretty much the last flight to leave the country the day the volcano started to erupt, so we were lucky to get away in the first place. We had a lovely week in the Egyptian sun & then a bonus 4 days waiting for a flight home. Thankfully we didn't have to move hotels & we got upgraded to all inclusive, so it wasn't all that bad being stranded! But it's back to reality with a bump & straight back into work. It's also only just over 2 weeks away from my Moonwalk Marathon, yikes! The good news is the sun & sea has really helped to heal my feet, which were starting to wear themselves out, so I'm raring to go again & there's a daunting 20 miles planned for this weekend! Thank you to everyone for their support so far, there's still time to sponsor me if you would like to help Walk the Walk & the fantastic support they give to breast cancer charities all over the country.

You can find my sponsorship page at www.walkthewalkfundraising.org/rebecca_hodgson_mw

So, on to this weeks recipe & I thought I'd try creating a recipe using another of my fav Green & Blacks choccie bars. I've used the Espresso dark chocolate to create a delicious crunchy biscotti. The first time I made biscotti I was surprised at how easy it was, it's just a bit fiddly as you have to cook it twice. Apparently biscotti actually means twice baked in Italian? (Need an Italian to confirm that for me!) There are lots of different flavours you could try, almonds, dried fruit, chocolate whatever you like really. I think Espresso is a great variation & perfect with a cup of coffee!

250g plain flour
200g caster sugar
100g bar Green & Blacks Espresso chocolate chopped into small chunks
1 tsp baking powder
Pinch of salt
3 eggs
Few drops almond essence

1. In a large bowl, mix together the flour, sugar, baking powder, salt & chocolate chunks

2. Beat the eggs with the vanilla essence, then add a little at a time to the dry ingredients & mix until it's all combined into quite a stiff dough. If it's proving tricky you can always add a tiny dash of milk to help it along

3. Tip the dough out onto a floured surface & roll it into a sausage shape. I ended up making 2 sausages as it made it a bit easier to handle! Place them onto a baking sheet lined with parchment & bake in the oven at GM3/150c for 30 mins

4. Take them out the oven & leave to rest for 5 minutes. Then using a sharp knife slice the sausages on the diagonal, to make biscotti about 2cm thick. Place them back on the tray & pop into the oven for another 15 minutes. They'll still feel a little soft when you take them out the oven, but will crisp up when cool

So there you have it, delicious biscotti! I like to dunk mine in my coffee, Douwe Egberts coffee of course!! Enjoy, next weeks recipe is a request & it's going to be a goodie, see you then! Rebecca

21 April 2010

Week 14 - Moscow Mule Cheesecake

Hola baking buds! As you read this I am on holiday, hopefully soaking up the sun & sipping a Margarita by the pool. So in the words of Blue Peter, here's one I prepared earlier! Sorry it's a bit short, but between packing & painting my toenails, I just about squeezed in enough time to write this up. Normal service will be resumed next week!

This is the final creation in the series of cocktail inspired recipes & I have to say it is far more successful than the last one! The combination of ginger & lime is delicious, enjoy...

200g ginger nut biscuits
50g butter
1tbsp golden syrup
250g marscapone
200g cream cheese
2 limes

1. Crush the biscuits into fine crumbs, ginger nuts are tough cookies, so it's best to do this in a food processor. Melt the butter, stir in the golden syrup, then add the crushed biccies. Tip the mixture into a loose bottom tin & press down well using the back of a spoon, pop it into the fridge while you prepare the topping.

2. Mix together the marscapone & cream cheese, then add the juice & zest of the limes. Smooth this mixture over the biscuit base & stick it back in the fridge for a couple of hours to set. I like to add a couple of ribbons of lime zest to the top as decoration. To do this, only zest 1 1/2 of the limes & use a veggie peeler to peel ribbons off the remaining half.

This makes a great dinner party desert, really fresh & light, & something you can just magic out of the fridge at the end of the meal! Right better get back to the packing, I think I have a few too many shoes....we are only going for a week. See you next week, Rebecca

14 April 2010

Week 13 - Clementine Cake

Hello, this week is a double celebration! Not only has my baking challenge reached a quarter of the way through, but my friends welcomed their baby daughter into the world on Friday. It's fabulous news & I promised that I would make this cake to celebrate, so this one is for the Cooper family, congratulations! Although with a new baby in the house, you're probably thinking baking will be the last thing on Mum's mind, but don't worry, I have packaged some of my cake up & it's on it's way up the country!

I really wasn't sure what a Clementine Cake involved, so for the first time I've sought help from a celebrity chef. This recipe comes from the domestic goddess herself, Nigella. It's such a delicious cake, but really simple to make. The only thing is you need to set aside a couple of hours to make it as the clementines have to be cooked thoroughly before they are used in the recipe.

375g clementines (about 6-7 fruits)
250g ground almonds
6 eggs
225g sugar
Heaped teaspoon baking powder

1. Place the clementines in a large pan of cold water, bring up to the boil & simmer gently for 2 hours. Drain & leave to cool, then cut them in half & remove any pips. Put the fruit, skins, pith & all into a food processor. Blitz briefly until you get a soft pulp. If you haven't got a food processor you can mash them by hand they are so mushy.

2. Add all the other ingredients to the food processor & blitz until combined. If mixing by hand, beat the eggs together with the sugar & mix into the clementine pulp, then mix in the ground almonds & finally the baking powder.

3. Butter a loose bottom cake tin & tip in the mixture. Bake in the oven at 190c (turn down to 170c if using a fan oven) for about an hour. I usually place a loose bottom tin on a baking tray just in case you get any overspill! The top will brown quite quickly, so it's recommended to place a piece of baking parchment over the top for the last 20 minutes.

4. Leave to cool completely in the tin, before turning out.

I think this is possibly one of the most delicious cake I've made so far. I don't think I've made a flour less cake before & I must admit I wasn't sure, but the ground almonds combined with the sweet clementines is amazing! I really hope you get to try this one out? If anyone has any other requests, I'll be happy to try them out :-) Next week will be the final in the series of cocktail cakes & hopefully will give you a taste of summer...ta ta, Rebecca

7 April 2010

Week 12 - Fruity Flapjacks

Happy Wednesday! Hope you all enjoyed the long weekend? So, Mr Brown has finally called the general election for 6th May. If anyone comes canvasing at my door, I think I'll ask them if they'll propose a new bill to make every Monday a Bank Holiday, I could get used to a 4 day week! Only thing is it means this week has gone way too quickly & I had a bit of a panic last night picking this weeks recipe. I thought you might like to know that last weeks Easter Nests were a big success at the cake sale, they helped raise over £1500. The money is being donated to our local Alzheimer's Society, so well done to all involved!

This weeks recipe is an antidote to all the chocolate we've had over the last few weeks & as they are stuffed with good stuff like oats & honey, I can kid myself that they are vaguely healthy! My Mum will probably kill me for saying this, but they are really good for breakfast with a lovely latte, especially if you have to eat on the run. I've chosen to use raisins & dried cranberries as that's what I had in the cupboard, but you could use 100g of any type of dried fruit.

100g butter
40g honey
50g caster sugar
50g raisins
50g dried cranberries
200g oats

1. Melt the butter in a large bowl, then add the honey. You'll have to give it a brisk stir to get it to combine, then add the sugar & stir again

2. Add the dried fruit, stir, then finally add the oats & stir again. It's not very technical this recipe just lots of stirring!

3. Line a baking dish approx 15cm x 15cm with baking paper (this makes it easier to lift out & cut into squares), tip in the oaty mixture & press down firmly using the back of a spoon

4. Bake in the oven at 180c/GM5 for around 30-40 minutes until the top is golden brown. Leave to cool in the dish for 10 minutes, then cut into squares. Leave to cool completely before lifting out of the dish & removing the paper.

I love these flapjacks, they're deliciously gooey on the inside with a crunchy outside, yum! So next week we hit a milestone in the history of Rebecca Bakes Cakes, we'll be 13 weeks into the challenge, that's a quarter done already. How time flies when you're having fun! Hopefully it'll also be a celebration cake as I'm hoping my friends bubba will have joined the world by then, he/she is already fashionably late! Till then , Rebecca